Here is a Fantastic article I found about lighting for when you are just starting out as a photographer or if you have any questions regarding where to start when it comes to buying lights! Enjoy! :)
-Samantha
Beginner's Guide to Lighting Kits
by
Gary Miller, March 2010 (updated February 2011)
One of the goals of working under artificial light is to empower
ourselves to harness our knowledge and creativity to produce
predetermined results. It could be working with one or two small
speedlights or a few inexpensive fluorescents. It could also be lighting
a complex fashion set with thousands of watt-seconds of strobes,
softboxes, reflectors and spots. Once we start to understand that the
beauty of artificial light is that it can be carefully controlled, our
results will soon match our vision. And a lighting setup can be a simple
three light setup or dozens of strobes, with different kinds of light
modifiers. The key is
learning
how to control light—any kind. If some of these terms or concepts are
unknown to you at this point, don’t worry. We’ll soon sort them out.
What Are Your Needs and Budget?
In order to begin using controlled lighting, we have to decide what
kind of lights we need. The number of photographic lighting choices
today is mind-boggling. Tungsten. Small flashes. Big power packs.
Monolights. HMI’s. Fluorescent. The number of offerings is enough to
confuse even the most levelheaded photographer. So how do we make sense
of all this?
The first question you should ask yourself is for what purpose are
you going to use the lights? Still photography only, or video and
stills? Portraits only? Large scenes like the inside of buildings or
factories? Do you want to be completely mobile, away from electrical
power (in which case you will need battery-powered strobes) or is it
okay to be tied to the wall outlets?
If you are going to be doing both video and stills, you will need
some kind of steady lighting. This can be simple tungsten lighting, or
the more modern quartz variety or the latest fluorescent or
LED technology.
Obviously you can’t use flash for video but of course you can use
constant lighting for stills. So the choice is easy and there are lots
of individual lights as well as kits from which to choose.
A portrait setup is much simpler than a setup capable of interiors,
industrial or more advanced needs. With portraits you can get by with
one or two lights if necessary. Three or four are ideal. For interiors
or location work it’s not uncommon for pros to use upwards of a dozen
strobes.
Another consideration is cost. Very few photographers just starting
with artificial light know what the future portends enough to plop down
$10,000 or more for a professional
photo
lighting setup. A lot of this equipment is costly, so thinking ahead
and planning carefully will prevent a lot of grief in the long run.
Ideally, you should be able to add equipment over the coming years and
not render anything useless. To wit, I have Norman 200b portable strobes
that are 25 years old and work as well as they did leaving the factory.
Talk about workhorses!
This guide is for beginners getting started with studio lighting. I
go over various lighting kits on the market for photographers who want
to start experimenting with studio lighting but don’t want to drop a lot
of money on a kit. Future articles will go over more advanced and pro
lighting kits.
On-Camera Flash versus Off-Camera Flash
So let’s take a look at some possible scenarios and then examine the
most popular and well-proven photographic lighting equipment available.
More than likely, you are at the stage where you feel limited by the
camera’s built in flash. When subjects are near the camera, the
background is pitch black. Things that are too close are wildly
overexposed. People’s features, like high cheekbones, seem flat and
lifeless. You wish you could just grab the flash and re-position it.
Well, you have the right idea but, as you know, the only way to do
that is to buy a separate, shoe-mount flash. The ones made by your
camera manufacturer are the best choice, especially when you’re looking
for all the bells and whistles available today like
TTL flash metering, remote power adjusting, extra battery options, etc. Most of them are in the $300-$500 range such as the
Canon Speedlite 580EX II Flash, (
compare prices) (
review), or
Nikon SB-900 AF Speedlight, (
compare prices) (
review). If your budget is tight, however, there are a number of low-cost substitutes that will work just fine. The
Vivitar 285HV Flash, (
compare prices), is an excellent low-cost solution (~$110), for example. So is the
Sunpack PZ42XC Flash, (
compare prices).
Make sure you get a photo “eye” (a remote sync device that triggers the
second or more flashes) or radio sync system. We’ll discuss all this
and more in detail further down in this article.
Video or Stills? Or both?
First question: stills, video or both? If your answer is both (lucky
you, probably the proud owner of one of the new HDSLR’s) you need steady
lighting, often called hot lighting. It’s traditionally been called hot
lighting because the bulbs were, well, hot. Think about a 1,000-watt
tungsten halogen bulb. Or a 2,000-watt floodlight. Even putting your
hand near a 100-watt household bulb gives you an idea of how light
equals heat with conventional tungsten lighting. This is okay if you
have a big, air-conditioned studio in which to work but most of us can’t
afford that luxury. Our studio is often a corner of the dining room or
maybe an extra room off the garage. In a little space, the heat given
off by tungsten light can be unbearable. However, thanks to fluorescent
and
LED technology, lights have been developed that achieve the same level of light output without cooking you and your subjects.
Additionally, today’s DSLR’s are also much better performers with
less light. This means instead of 1,000 watts of light you can do nicely
with 300. It also means you can spend proportionately more money on
accessories like light modifiers, stands, clamps, backgrounds, etc.,
etc
Basic Lighting Kits: Hot Lights
My first choice would be a small lighting kit from
Lowel Light Mfg. They have an extraordinary number of choices, from small camera-mounted
LED
lights to multiple large fluorescents as well as their well-known
tungsten kits. Lowel has always been an innovator in hot lighting, and
now they have continued that tradition in cold lighting as well. Prices
start at $100-$300 for individual lights and $500 and above for complete
kits. A three-light kit is minimum (main light, fill and hair, plus
optional background light) for those interesting in making the
best-looking imagery (or footage). The Lowel Rifa is a great general
purpose light system, and their Tota is probably the best-known
workhorse along with the DP Omni. My favorite is the
Lowel DV Creator 44 Kit, (
compare prices),
which runs about $1100.00 but has everything you need—a very extensive
list of heads, stands, frames, gels, etc. all packed into a handy case.
Other manufacturers with a good reputation for hot lights are Arri, Chimera, Cool-Lux, Dedolight, Elinchrome, Hensel,
JTL, Norman, Interfit, Photoflex, Smith-Victor and Wescott. All are available from our partners. Go
here to search for lighting gear. Many of them offer kits similar to Lowel, with a wide variety of models and power to choose from.
Flashpoint, Adorama’s low-cost proprietary brand, makes an excellent low-cost cool fluorescent light kit:
Flashpoint 3 Light Fluorescent Kit, (
compare prices),
and is available for about $160. It comes complete with light stands,
two kinds of umbrellas (shoot-through and silver reflective), standard
reflector, bulbs and case. This is really a great choice for the
beginner in terms of cost and value.
Smith Victor, a manufacturer known for high-quality but moderately priced gear, offers a great
Smith Victor KSB-1250F Kit, (
compare prices), including both tungsten as well as fluorescent bulbs, light stands, case and an excellent guide to lighting. About $600.
An important note for safety’s sake: Hot lights are,
indeed, hot. Be careful! Don’t let flammable fabrics or other items get
close to the lights. When you use diffusion material makes sure it’s of
sufficient distance from the bulb so there is no smoke or burning
smell. Wear gloves when handling accessories like barn doors than can
get really hot during a shooting session. And always use sand bags or
other weights to securely anchor light stands if there is at all the
possibility of them tipping over.
Usually the heat alone is enough to encourage you to practice safe
handling, but it’s a serious concern, so please take heed. Better safe
than sorry. It’s also an excellent idea to have a fire extinguisher
nearby. In fact, it’s mandatory in a commercial studio so do as the
pros do.
How Many Lights? What Accessories?
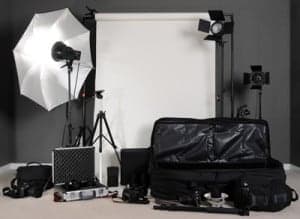
Whether it’s constant or strobe lighting, the basic kit should
include one broad source of light, with an umbrella or softbox, a fill
light (can be a shoot-through umbrella), a hair light with snoot or
grid, and a general-purpose light for the background. You can start with
one light (the main) and add to your collection over time as your
budget allows.
The umbrella or soft box spreads the light over a wider source,
giving softer shadows and a “wrap around” effect that is flattering and
very elegant looking. The fill light can be used with another umbrella
or can simply be reflected off a simple piece of white Foamcore™ at a
45-degree angle to the subject. The hair light and background light can
be smaller units; the only requirement is that the hair light should
have a snoot (cone that keeps stray light from hitting other areas) or
grid (waffle-like device that does the same thing). The background light
might have a filter frame so you can experiment with different colored
filters or gels.
Remember that tungsten light, typically quartz, is 3200 degrees
Kelvin. So if you are shooting a scene with daylight pouring in a
window, you either have to cover the window with an orange gel, called a
CTO, or cover the lights with a blue gel, called
CTB.
Which solution you use is usually a factor of which light is stronger. A
large living room with half a dozen light fixtures is easier to match
by gelling the window, for example. A good source for a lot of hot light
accessories is
The SetShop or
MarkerTek).
Before leaving hot lights, we should note that there are two really
inexpensive solutions to hot lights. One is at your local hardware
store: aluminum reflectors with a 500-watt household tungsten bulb, $15
to $20. The other is through dealers like Adorama that now offer
inexpensive fluorescent lighting fixtures and kits with the Flashpoint
brand, starting at $35 for one light to $100 for a fixture that holds
four bulbs. Cool! (Literally.)
So our beginner’s tungsten or fluorescent lighting kit consists of:
Small Speedlight Set
If you are only shooting stills, you can build your electronic flash
system the same way. Start with one small extra speedlight, get some
experience with it, then add a larger umbrella or softbox unit. Then add
another small speedlight with grid for the hair light and finally a
fourth light for background. You may find that you don’t need the hair
and background lights for your particular style of photography. The
four-light system is the traditional setup for studio or executive
portraits, but you may find your interest lies in shooting babies or
little children, where a two-light umbrella or softbox setup is enough.
A good small speedlight set includes:
Note: Instead of umbrellas you can use some of the products that HonlPhoto
offers. They have an amazing number of innovative small speedlight
accessories that are inexpensive and very effective, such as small
reflectors, gobos (to shield the light), filters and grids (to focus the
light).
Monolights & Monolight Kits
Up one step from the shoe-mounted flash is a monolight, sometimes
called a monobloc. This is a small AC-powered strobe that is completely
self-contained. Reflector, power supply, umbrella and light stand holder
and AC power cord are all built into one unit. They range in size from
the proverbial loaf of bread to ones that are about the size of a
toaster oven. The advantages are (in most cases): built-in modeling
light, no need for a separate power generator, built-in photo eye or in
some cases radio sync slave, adjustable power output, and ease of using
light modifiers like umbrellas. They also provide some degree of
redundancy for backup, that is if you have three or four of them and one
fails, you’re usually not completely out of luck. If you’re using a
generator-based system and the unit goes south, you need to have at
least one for backup or be able to rent one nearby.
One of my favorites in the monobloc category is the compact
Bowens Gemini 200 Kit, (
compare prices).
These are very well-made, reasonably priced ($375.00) professional
quality units that have withstood the test of time over the years.
Today, they can also be powered by a battery unit (such as the
Bowens BW7693 Small Lightweight Travel Pack Starter Kit, (
compare prices)
(about $600) which is essential for location solution. For the budding
photographer who will eventually add to his or her kit when moving up,
these are an excellent investment.
Wescott offers a value-driven three monolight setup:
Westcott Strobelite Three Monolight Kit, (
compare prices),
including three 150 watt-second monolights, stands, umbrellas, sync
cord and floor positioning mat (a great learning tool) plus a complete
lighting course on
DVD
So, here’s our monolight kit:
- 3 monolights, at least 150 watt-seconds each
- 3 light stands
- 2 smalll clamps
- 1 roll Gaffers tape
- 1 barn door
- 1 reflector
- 1 snoot
- Extension cords (hardware store
The other alternative for low-cost beginner outfits is used equipment. If you check the
classified section of Photo.net,
you will often see an old Norman 200b or Bowens monolite or similar
strobes for a very reasonable price. If they have been used continuously
or at least from time to time, you’re more assured of getting a working
unit. Older units that have been sitting around for many years often
have dried up capacitors. Still, if the price is right, having them
repaired can be a relatively inexpensive investment.
Radio Slaves
We mentioned the challenge of synchronizing all your lights. That is,
they all have to go off at the same time. There are four ways of doing
this. First is hard wiring, that is, all the flash units are plugged
together by sync cords and extensions. This is the least desirable
because it is prone to failure due to broken wires or other seemingly
invisible factors. Even a slight bit of humidity and one or more of the
strobes will undoubtedly fail to fire—and that will be the best
expression on your subject’s face, of course. You also have the problem
of running cables around doors and walls. So let’s look at the other,
wireless, options.
The least expensive way is with small light-sensitive triggers that plug into the sync cord connection of your speedlight.
Wein
was a pioneer in this field and continue to dominate it with new and
improved products every day. They range in price from $15 for the basic
100-foot range model to $100 for a super-sensitive 1000-foot model.
There are a number of other manufacturers making light-sensitive
triggers, including Adorama, Morris, Metz, Nikon, Norman, Photogenic,
Sunpack and Speedotron. All work pretty well indoors, but outdoors in
bright sunlight is another matter. Some of them will tolerate a certain
amount of sunlight; others will not tolerate any at all.
The same problem is with infrared triggers. They work fine as long as
you have indoor line-of-sight conditions but outdoors they can be
problematic. The most popular and reliable device is the radio slave.
These range in price from very cheap ones you find on eBay to the
professional’s favorite—the PocketWizard. In addition to triggering the
strobes, PW’s can trigger the camera as well. At the Kentucky Derby or
Olympics it’s not uncommon to see 20 or 30 cameras set up for remote
firing, all dressed up with PocketWizards.
A couple of companies—PocketWizard, Radiopopper, Cactus, Quantum—are now making radio slaves that work in the
TTL mode. That is, you set your camera and strobe to
TTL (through-the-lens) and the flash units puts out only enough light based on what you have set the camera’s
ISO. As an example, I took my Canon
DSLR out in the sunlight, put two Canon 430EX II’s on light stands, put a
PocketWizard MiniTT1 Transmitter [Canon], (
compare prices) on the camera and a
Pocket Wizard FlexTT5 Transceiver [Canon], (
compare prices)
on each strobe, and started shooting. Perfectly exposed images right
off the bat! Totally amazing, foolproof and flexible. You can also shoot
in what’s called the high-speed sync mode, enabling f/2.8 shots
outdoors in bright sunlight to put the background beautifully out of
focus. What’s nice about the PocketWizard system is that any upgrades
are easily incorporated via downloaded firmware.
Conclusion
There are lights and kits for every budget and purpose. Don’t let the
myth that lighting is expensive keep you from enjoying this critical
aspect of photography. Start small and expand as you get the feel of it.
However you acquire your lights, the most important advice is to use
them. Practice setting up one, two or more lights. Bounce them off
umbrellas, foam core reflector boards, or the walls and ceilings.
Practice using hair and background lights, or mixing artificial light
with daylight. You’ll soon find that even the simplest lighting setups
can produce dramatic images.
Look at photographs made with artificial light and analyze how they
were lit. What are the qualities of the light (soft, hard, edge, etc.)?
How does the lighting convey the mood and intent of the photograph? In a
portrait, what does lighting contribute to the viewer’s perception of
the subject?
Don’t just put up your lights one way and then after your session take them down and put them away. Experiment. Use a slow
shutter speed
to let the background burn in. Use motion to add intrigue. Put the
lights up high, down low, to the right and to the left. The only way you
will maximize your investment in lighting gear is to practice using it.
About the Author
Gary Miller has been
photographing, writing, and editing for magazines, corporations and
organizations for more than 25 years. He has also written, produced and
directed hundreds of corporate and
educational
films and videos. He counsels corporations, organizations and
individuals on public relations and marketing strategies, including web,
print and photography. Today he is an active freelance writer and
photographer on subjects including photography, sailing, fishing, travel
and video production. His editorial work appears in
TV Guide,
Time,
Newsweek,
Yachting,
Business Week,
Motor Boating & Sailing,
Good Old Boat,
Soundings,
National Wildlife
and others. Some of Gary’s film and video clients include Financial
Management Network, Salomon Smith Barney, Stauffer Chemical,
MAC Group, MasterCard International and
AMEX. He is the author of a book on
Freelance Photography (Petersen Publishing), and guest lecturer/workshop host at the New School, New York City.
http://photo.net/learn/lighting/guide-to-lighting-kits/beginner/


